Sections:
Ethics, Equipment and Conduct
Introduction to Sliding
Balance – Part 1
Balance – Part 2
Delivery – Three Step Technique
Delivery – Five Step Technique
Grip, Rotation and Release of a Rock
Position of the Rock for a Three or Five Step Delivery
Delivery with a Stick
Sweeping
Sweepers’ Roles and Responsibilities
Rules
Roles and Communication Between Players
Sliding – Traps to Avoid
Turn and Release of the Stone – Traps to Avoid
Different Shots and Signals
Timing
Strategies
Strategies – Continued
|
Once the grip, turn and release of a rock have been well integrated, we examine the position of a rock for a three or five step delivery.
Three Step Delivery
- Approach the hack from behind.
- Place the non-sliding foot in the hack, toe at approximately 2-6 cm from the end of the hack.
- Step forward, sliding foot beside the non-sliding foot in heel-toe position (about 30 cm apart) so that the feet are parallel and offset to allow a stable and comfortable position.
- Squat down.
- Place the broom or stabilizer making sure the head, shoulders and knees are aligned towards the target.
- Hips should be raised so that the back is parallel to the ice.
- Place the sliding foot between the non-sliding foot and the rock, giving it a 45-degree angle while remaining comfortable.
- Slide by pushing with the foot in the hack.
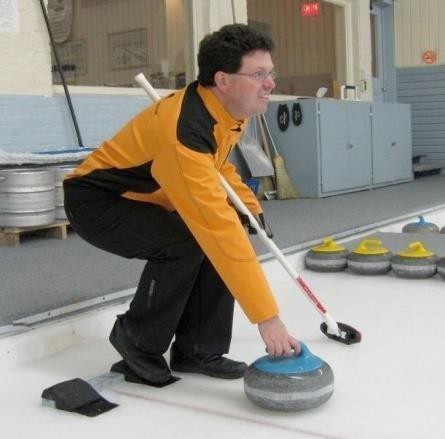
As you can see, the arm holding the rock is in front of the body, comfortably extended, the elbow is in front of the sternum. The arm holding the broom or stabilizer is extended at an angle of approximately 120 degrees. The skip provides a target with his or her broom. The player aims for the broom and the rock will follow the desired line, ideally stopping where the skip intended. .
|
|
|
|
Position of the foot in the hack and of the sliding foot
|
Position of the knees, hips and thighs
|
No pressure should be exercised on the rock when sliding because this slows it down. The rock is not used as a stabilizer to keep your balance. To acquire stability, we recommend learning to slide without a rock. In the beginning, you can practice with two stabilizers.
When sliding, the rock stays in the target line until it is released. To do this, good balance is essential.
Five Step Delivery
- Approach the hack from behind.
- Place the non-sliding foot in the hack, toe at approximately 2-6 cm from the end of the hack.
- Step forward, sliding foot beside the non-sliding foot in heel-toe position (about 30 cm apart) so that the feet are parallel and offset to allow a stable and comfortable position.
- Squat down.
- Position the arm holding the rock and the one holding the broom or stabilizer. The arm holding the rock should be in front of the body, comfortably extended, with the elbow in front of the sternum. The arm holding the broom or stabilizer is extended.
- Hips should be raised so that the back is parallel to the ice.
- Slide the sliding foot behind in reverse heel-toe position, i.e. the toe of the sliding foot is 6-8 cm behind the foot in the hack. The sliding foot should always be beside the hack never behind it.
- At this point, the hips should move at the same time as the foot. The hips should always be directly above the sliding foot.
- The player should take a small pause or hesitation once in the reverse heel-toe position. During this brief pause, approximately 80% of the body’s weight should shift to the sliding foot.
- As the sliding foot changes position, the hand holding the rock should also be in motion. It should slide backwards, directly in front of the hack foot, without, however, touching this foot’s toe.
- Weight is then shifted to the hack foot and the player pushes with the leg of the hack foot (the shift between the sliding foot and the hack foot is what generates a good thrust, allowing the player to deliver rocks with different weights: draws, take-outs, etc.)
- Move the rock forward.
- Move the sliding foot forward.
- Slide with the rear leg extended as much as possible.
As you can see, the only thing different in the five step delivery is the fact that the player slides the rock and the sliding foot backwards before moving the rock forward as in the three step delivery.
Tip
Be careful not to put weight on the rock. Work on your balance.
|