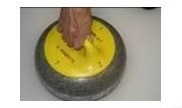
It is important for the wrist to be high, i.e. only the fingers are touching the rock and not the palm of the hand.
Fingers should be slightly bent, so that the handle is in the cup of the fingers.
Fingers should not be at one or the other end of the handle.
The handle should rest on the second joint. The thumb and index finger form a V. Fingers are together and the grip is firm.
The thumb is placed on the opposite side of the handle, with pressure applied between the fingers and the thumb.
The arm should be bent, the elbow and hand placed before the sternum.
Upon release of the rock, the arm should be in a “hand shake” position.
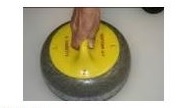
V between the thumb and index finger pointing towards the opposite shoulder.
The handle sits on the fingers’ second joint.
Important: The grip shall not be made with the palm of the hand.
Keep wrist high.
The index finger, as well as the middle and ring fingers are the main driving force, and these fingers are placed under the handle.
Initial Position of the Handle for Turns
Initial Position for Rotations (Turns)
Position Upon Release (12-o'clock)
Rotations (Turns)
The hours on a clock are used to represent the initial position of the handle to get the desired turn.
The player is at 12-o'clock (noon).
Clockwise turn (curl from left to right): Handle at 10-o'clock
Counter-clockwise turn (curl from right to left): Handle at 2 o'clock
Player = 12-o'clock
Reference
Initial grip
Clockwise turn (at 10-o-clock)
Initial grip
Counter-clockwise turn (at 2 o-clock)
Rotations (Turns)
Curl: Why does a rock curl? Because of the pebbles on the ice, those small frozen droplets forming tiny bumps, allowing a rock to curl as it travels along the sheet. A rock would travel in a very different manner if the surface was totally smooth.
Rotations (Turns): Players want their rock to curl in the right direction. To do this, they give the rock a turn in the desired direction.
Release of a Rock
Release of the rock shall be initiated while sliding, before the player loses momentum. At less than a meter from release, the player turns the rock back to the 12-o-clock position. The total release distance should be equivalent to the length of a brush (from 10-o-clock to 12-o-clock). You must learn to synchronize speed and distance to release the rock at the right moment. You should feel that you control the rock without having to push it for lack of speed.
When releasing the rock, the player’s hand should be in a “hand shake” position. The rock should not be given a spinning effect. A rock thrown consistently with a proper release should make two to three complete revolutions before reaching the house. You must be careful not to catch the rock with your fingers, which might slow it down or make it deviate.
A correct delivery requires the player to aim for the skip’s target, extend the delivering arm towards the front and continue to slide behind the rock. The arm, hand and fingers of delivery continue to point along the line of delivery towards the target (the skip’s broom).
Tips
Make sure your grip is right, check to see if delivery starts at 10-o-clock or at 2-o-clock and ends at noon.
Is the wrist too high? The palm of the hand should not touch the rock.
Focus on waiting to start releasing the rock one length of a brush from the release point.
Players should start releasing the rock before their slide starts losing momentum.
Players should complete their release within one length of a brush.
At least two complete turns should be generated upon delivery.
Keep fingers in the same position until the moment of release.
Keep moves simple.
Remember to never use the wrist.
Release should be flowing and not jerky.
Grip and release
Member Login
Upcoming Events
No events
League Schedules
League schedules, teams and results can all be found in the members section of the website once you LOGIN.